How to shoot…..

MarkBarbieri

Semi-retired
Joined
Aug 20, 2006
I’m starting this thread as a place for anyone to offer advice on how to shoot a particular subject. I’d like to gear this advice towards beginners or hobbyist without lots of experience or fancy gear. I’d also love it if you contributed. Maybe that means adding a “How to shoot” section on something you know fairly well. Maybe it means adding some comments to someone else’s section. And feel free to offer lessons you’ve learned on what NOT to do. I know that a lot of what I’ve learned is from doing things that failed miserably and learning not to do them again.
 
How to shoot simple portraits

It’s a very common photo scenario. You want to take a picture of a person or two with the main focus being that person. Here are some of my tips on how to do it.

It is usually better to use a portrait orientation (long side vertical, as opposed to landscape where the long side is horizontal). An exception to this is when you want to show the person in the context of their surroundings. In that case, you might want the person a little to one side of the picture with a major focal point (ex. Cinderella’s castle) on the other side.

You usually want your subject’s eyes to be in the top half of the picture. If you don’t think about it, it is easy to end up with their eyes right in the center of the image, but that usually leaves a lot of boring space above them near the top of the image. If it is one person, I like to keep them centered from a left-right perspective. The exception is what I mentioned above – when you are balancing them with something on the other side of the picture. If you are taking a picture of multiple people, be careful to center the group. When I’m not paying attention, I sometimes center the person in the group that I’m concentrating on the most and that looks goofy if they aren’t in the middle of the group.

With kids, get down on their level. You generally want to be at eye level with your subject when you can. With pets, sometimes that means lying down on the floor. An eye level picture is usually more engaging. On the other hand, you can make people look larger and more important by shooting up at them or smaller and more childlike by shooting down at them.

If you zoom out and walk closer to your subject, you’ll be able to include more of their surroundings in the picture. If you walk further back and zoom in, you’ll eliminate more distractions, and the picture will be more focused on your subject. Also, if you put them somewhere with the background farther away, the background will be less in focus and less distracting.

There are a few traditional ways to photograph a person. You can include just their head and shoulders. You can pull back and show them from the waste up. You can get further back and get them from their calves up or even show them in their entirety.

Watch the lighting. You don’t want hard shadows on your subject’s face. You also don’t want them facing into the sun because they’ll squint. Ideally, you put them in a shady or cloud covered area and shoot with something darker behind them. Often, I find that the best place is just on the edge of the shade where the light is still soft but lighter than the deeper shade areas. If your subject looks too dark, many cameras allow you to tap on their face before you take the picture and it will adjust the lighting for their face.

Pay attention to what is behind your subject. Avoid having poles, trees, or other objects “growing” out of their head. If you can, find a background that frames your subject or provides lines that lead to your subject.

Try to keep your subject loose and comfortable. Chat with them. Keep things light. Joke with them. Unless they are a trained model, their mood will probably come through in the pictures, so you want them to be in a good mood.

Posing is a lengthy topic, so I'll just make one point. Generally, people appear slimmer when at a angle to the camera and they appear wider when squared up with the camera. For a couple, I'll often angle the a woman and square up the guy.

Take a few shots. That gives you a little protection in case you catch someone blinking or glancing away.


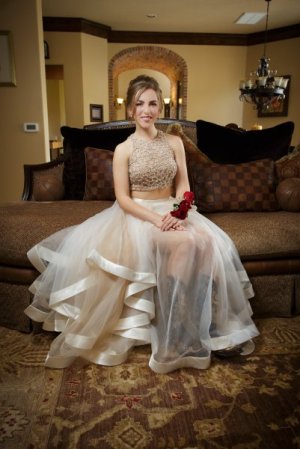
She fills most of the frame, but I left room to show the context of her living room. I framed her head with the archway behind her. I used the top lines of the couch behind her to lead to her head. She wanted her boots to be visible, but I didn't want them to be too distracting, so we agreed to have them visible under her dress. She's centered horizontally.
5D3_1571.jpg

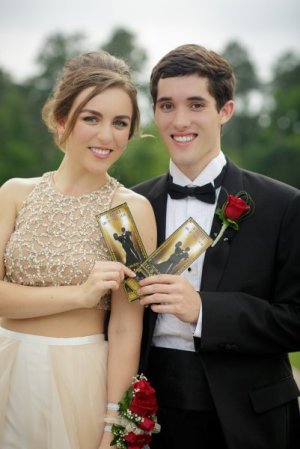
The couple is centered. They are holding their tickets to show context for the event (it was prom night). She's at slightly more of an angle than he is. It was cloudy, so I didn't have to worry about shadows. I put the sunnier side of the clouds behind them, which gives a nice glow on their shoulders to add separation from the background. I put the background well behind them so that it isn't a distraction.
5D3_2021.jpg
 
Great idea for a thread! We can learn so much from you!

Thanks for your efforts. I hope lots of people will join in.

Love the portrait photos. Everything about them is really great - composition, lighting, colors.

I wouldn’t have noticed the boots until you mentioned them, but I absolutely love it!
 
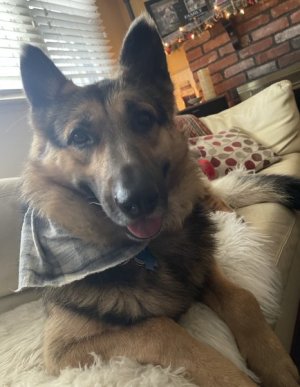
We do a lot of pet photography. I say we meaning DD and I. Between us, we take a lot of pictures, so some of these are hers, in fairness. (She had a good teacher. ;) ) We take and share so many they often all meld together.

I’ll start with these, because I think they show a lot of emotion. As the photographer, I’m not sure that’s what was intended originally, but I realized later, that’s what came out.

The context is a dog we rescued about a year ago, and how he went from a terrified, lost soul, to a beloved and contented member of our family. He’d lost his person, who’d passed away, and found himself, first, in a shelter, then in a foster home living out of a utility room, and finally on a truck with 65 other dogs coming to an unfamiliar place he’d never been to before. In the cold.

From our side, we were so happy to have a German Shepherd with us again. From his side, he didn’t know who we were, where we were taking him, or what was in store for him. But he trusted us. And we had to trust him, as he was ours now.

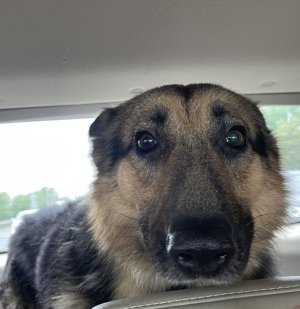
Very first moments in the car with us after pick up at the rescue, which was a little chaotic. We waited in a line of cars, they ran him to us, lifted him into the back, closed the lift gate, and waved us goodbye as we drove off.
1681988194435.jpeg

I deliberately left a lot of space at the top to show that he was in the back of a car. Eyes are in the middle, but “rules“ in photography sometimes are meant to be broken. Ears are pinned back because he was scared, but normally they would be up and take up a lot of that bare space.

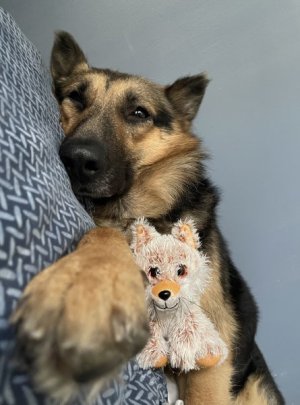
First days with us. Tried to make him feel at home. I imagine he was missing his person. And wondered what this person was doing near him.
1681988559363.jpeg

Down at his level, capturing some of the scars of his past - ears a little chewed up and belly sunken in. Not too interested in toy, may never have had one before. Still unsure but seemingly happy to have a soft and quiet place to lay. Still exhausted from journey and medical treatment (heartworms). When photographing animals you should always be mindful that they could react aggressively if they feel threatened. If pet seems anxious, end the session.

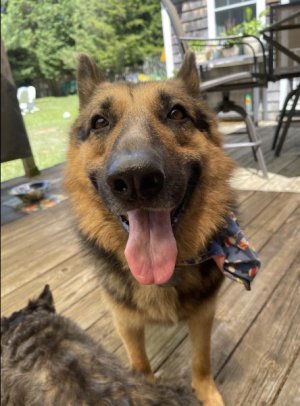
Hey, I’m starting to like it here! Plenty of room to run free, weather’s warmed up :teeth: , lots of fresh water (and good food), my own bandana, and a little buddy-brother to play with (torture!).
1681990078675.jpeg

This may well be a case of, you find good lighting, then you find your subject, rather than the other way around. A principal we try to live by.

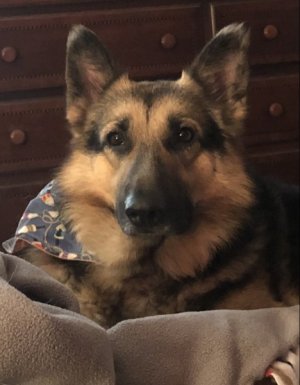
I have blossomed. I’m learning the routine, and what’s expected of me. I like being inside and part of a family.
1681990615880.jpeg

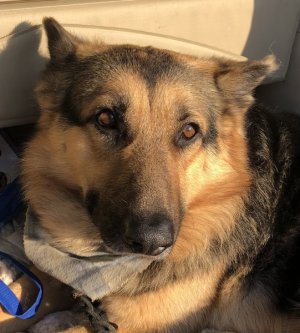
Again, lighting and composition. I’m just realizing that with dogs who have large ears, it may be more challenging to keep eyes at the top, depending on the setting. I try not to use a flash with dogs because for some reason, they are more prone to red eye. This portrait does not show the true beautiful brown color of his eyes, but I liked it anyway.

My confidence is growing and I am free now to be my goofy self. I like to play in the dirt!
1681991419875.jpeg

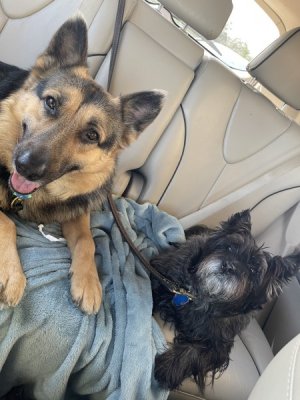
Lighting’s a little off on the left there, but difficult with two types of lighting (as I think Mark explained somewhere else recently, can’t remember where). Overall, I can live with it. Looking up slightly so he may seem a little bigger than he is.

I am much more happy and confident in the car now. I’m home.
1681991651128.jpeg

Photo taken from the front seat and turned out to be a nice example of typical weekend morning rides in the car. Portrait orientation to capture both made it an interesting composition. Lighting was good.

Hope you’ve enjoyed the story and the photos of our beautiful boy.
1681992119099.jpeg


Portraits

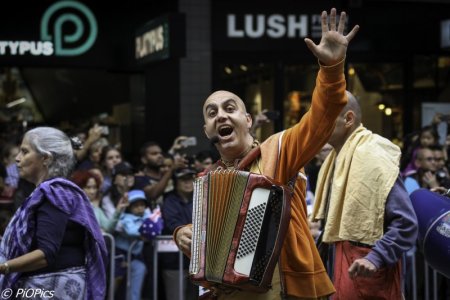
My take on portraits involves street photography.


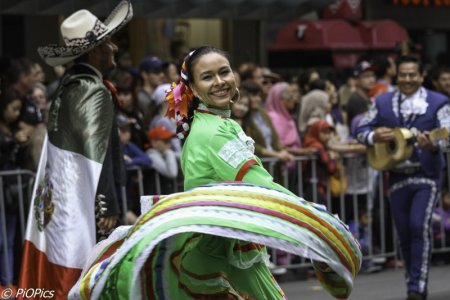
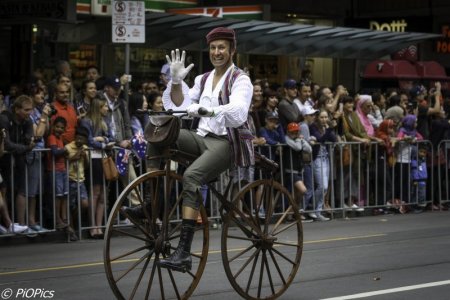
Melbourne has a lot of festivals. Some even have street parades. I used to go hit the street parades as a means of practising for Disney parades.
As with Disney, if you have a big camera and lens, people will look your way and pose.

With street photography and parades, I prefer to take the shot with a landscape orientation; rather than the traditional portrait.

0126 Australia Day-230.jpg


I like to see more of the surrounds and crowds during parades. It is a personal preference.


0126 Australia Day-273.jpg


0126 Australia Day-331.jpg
 
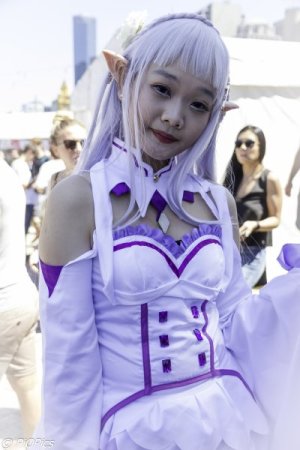
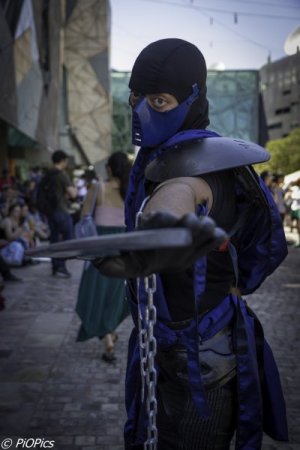
Portraits - CosPlay festivals


One of the many festivals that Melbourne hosts is Japan Festival.
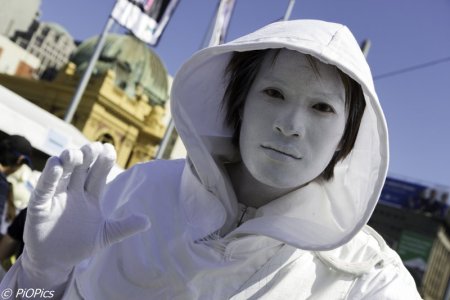
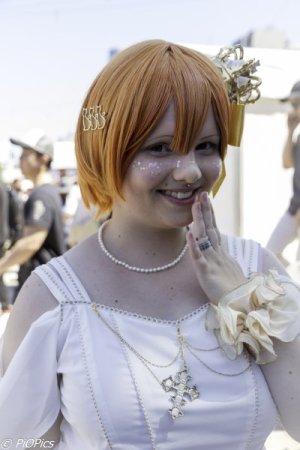
For this festival, the cosplayers do come out and play. And where there are cosplayers, there are photographers.

It's still a form of street photography; but it can be more like a traditional portrait shot.

I normally ask the cosplayer if I can take their image. I find that when I ask permission, they will pose for you and look at your camera.


0226 Festivals-2.jpg


0226 Festivals-153.jpg


0226 Festivals-156.jpg


0226 Festivals-147.jpg


There isn't a 'perfect' backdrop for this kinda of shooting. But the guidelines that Mark listed above hold true.

Be aware of what is behind the subject; you really don't want anything that seems like it's growing out of their head.

Lighting is even more important as you may have to contend with harsh bright midday light.
Sometimes, it is easier to move into a shady spot and shoot there; instead of staying where the cosplayer and you may have met.

Shoot in portrait orientation and fill the frame as much as possible.
 
How to Shoot - Long Exposure


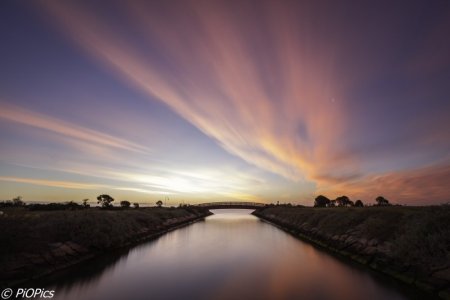
Long exposure = longer shutter speeds. The camera/your image is capturing “time exposure” by leaving the shutter open for longer than you would normally do for a standard ‘exposure’.

The intent is to create a photo that somehow shows the effect of passing time, be it blurred skies with streaks of clouds, smoothed out water like if it was frozen, blurred ghostlike people, star trails, moon trails and light trails.
It isn’t the duration of the exposure that qualities it as long exposure but rather the intent.

Long exposures are easiest to accomplish in low-light conditions, but can be done in brighter light using neutral density filters. Typical genres for long exposure include:

  • Landscapes – blur the moving clouds, or waving grass
  • Seascapes – soften the water and making it smooth
  • People – to make ghostlike appearances of crowds with people


You will need a tripod for this technique.

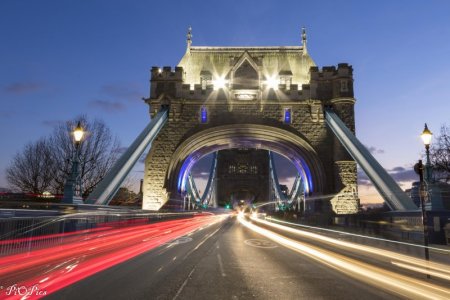
  • Find a spot at twilight where there might be cars moving; preferably with their headlights on.
  • Decide where you are going to shoot and set up camera on the tripod.
  • Set your ISO at 100 as a starting point.
  • Use an aperture setting between f/8 – f/11. For most kit lenses, this is generally the ‘sweet spot’ for a sharp picture. It is also the aperture setting that will allow you to get foreground, mid-picture and background in focus.
  • Start with 2 seconds and check your picture after you take it. If it is too dark, change the shutter speed to 3 sec. If it is too bright, change it to 1.6 sec. Check again after your next shot and adjust if needed.
  • Using an ND filter will help reduce the amount of light hitting the camera sensor. This is useful for daytime shooting and in some cases for night. Remember that there is less light around at night anyway, so the ND filter may be best left in the bag. If you are considering getting a ND filter, remember that you do get what you pay for. The general norm is to have a 3-stop, 6-stop and 9-stop filter in the bag.

2023 UK-8920.jpg


For consideration.

  • Find a subject that you want to shoot. It needs to include moving objects around it to demonstrate the intention of long exposure. Consider the weather conditions and factor in cloud movements (or if by the beach rising tide times).
  • If using a tripod, it is recommended that you turn your Image Stabilizer off to reduce internal vibration.
  • If you have a remote trigger, it could be useful as it does help reduce internal vibration. If you don’t have a remote trigger, use the 2-second timer delay on your camera.
  • If using an ND filter, there are any number of calculator apps that help work out the right exposure. But really, its more about playing with your settings to get the shot exposed properly.


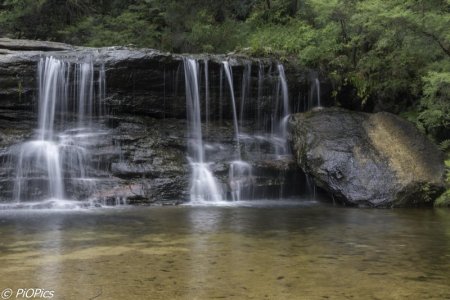
Long exposure can add interest to waterfalls.


0611 BlueMts-194.jpg


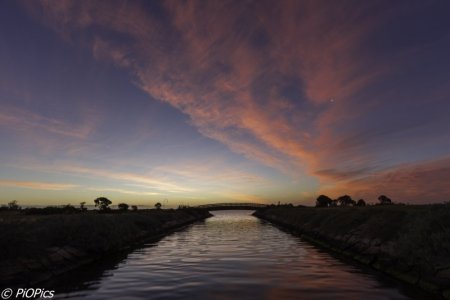
In this example, long exposure has resulted in the streaky clouds and making the water have a glass-like quality.

0201 ElwoodSunset-39.jpg


The 'standard' shot for comparison purposes.

0201 ElwoodSunset-41.jpg


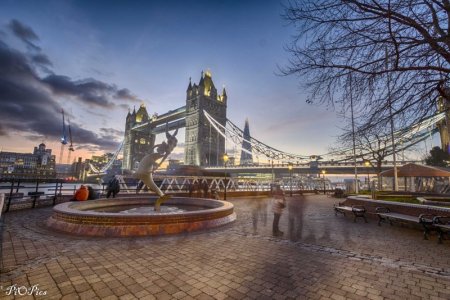
Here's an example which includes ghost-like people in the shot.


2023 UK-8847f.jpg


Hope you'll head out and have a play! If you do, please post your images.


princess::upsidedow


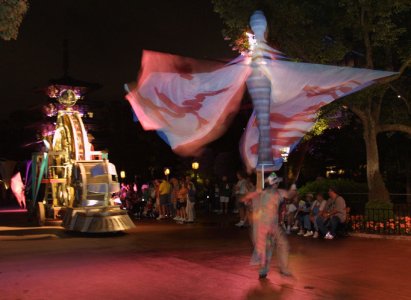
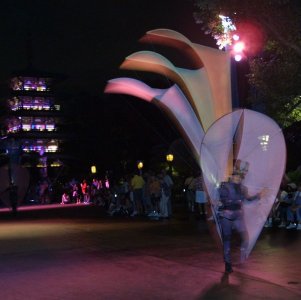
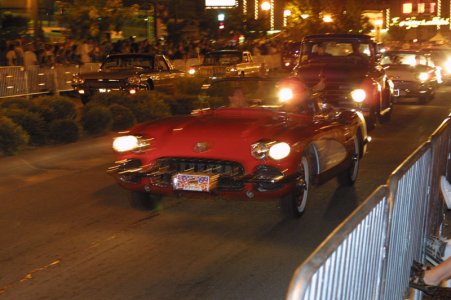
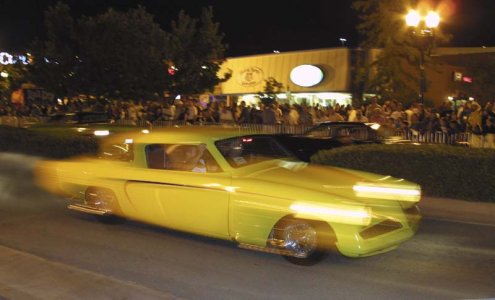
One of the great features of photography is to show something that our eyes can't see. One of my favorites is capturing motion after dark with 2nd curtain flash. 1st curtain, our usual flash mode, will often make the subjects appear as if they are moving backwards. TTL flash can be turned down a 1/2 stop or so to reduce the harsh light. Shutter speed depends on the speed of the subjects, maybe start with 1/4 second and adjust from there.

103-0344_IMG.jpg103-0348_IMG.jpgIMG_3854-800.jpgIMG_3922_800.jpg
 
"Using an ND filter will help reduce the amount of light hitting the camera sensor. This is useful for daytime shooting and in some cases for night. Remember that there is less light around at night anyway, so the ND filter may be best left in the bag. If you are considering getting a ND filter, remember that you do get what you pay for. The general norm is to have a 3-stop, 6-stop and 9-stop filter in the bag."

That 's the way I do it, but my son just showed me that his phone (Pixel 7) has a "Long exposure mode" that works in broad daylight without any filters. Amazing.
OM Systems OM-1 also has a ND mode, works pretty well in daylight.
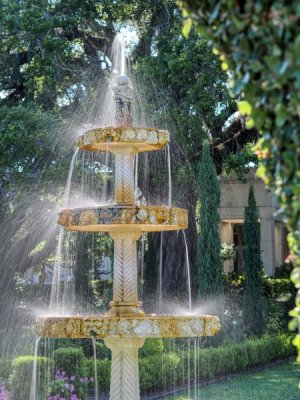
_fountain_P5101099.jpg
 
A long exposure taken of downtown Colorado Springs with a Canon T6s; not taken any since then

IMG_3298ed2-XL.jpg
 
"Using an ND filter will help reduce the amount of light hitting the camera sensor. This is useful for daytime shooting and in some cases for night. Remember that there is less light around at night anyway, so the ND filter may be best left in the bag. If you are considering getting a ND filter, remember that you do get what you pay for. The general norm is to have a 3-stop, 6-stop and 9-stop filter in the bag."

That 's the way I do it, but my son just showed me that his phone (Pixel 7) has a "Long exposure mode" that works in broad daylight without any filters. Amazing.

Didn't know that about the Pixel 7 Mark! I will have to try it out soon.
 
How To Shoot Sequences

I love a collection of pictures that tell a story. Try taking a bunch of shots of some activity and print several small pictures of the activity rather than one large picture. Or run the pictures together in a slideshow.

There isn't too much to it other than "take a bunch of pictures of an activity". You just have to remember to do it. It does help if there is obvious continuity between the pictures both in substance and style. For example, if it involves a group of people, keep them in the same relative positions for the sequence. Don't have them swapping sides between shots.

And sequences don't always have to be the same activity or taken at the same time. A sequence might be taking a picture of a child in the same spot once a year to show their growth. Or maybe taking a picture of someone every day to show how their outfit changes. But make the "story" obvious. If you are doing an outfit sequence, eliminate all the extraneous detail you can other than the outfit so that your viewer can easily understand what you are trying to say.

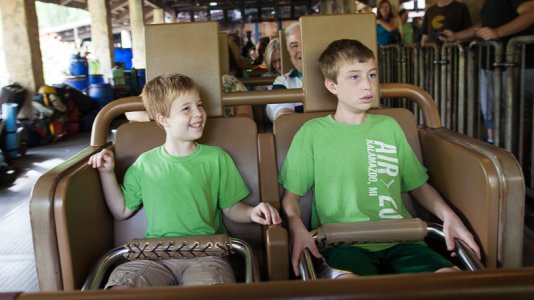
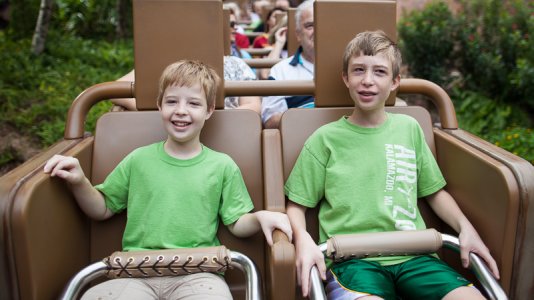
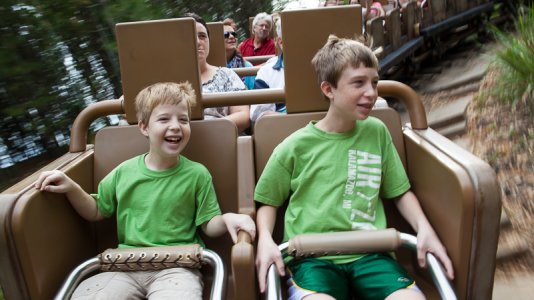
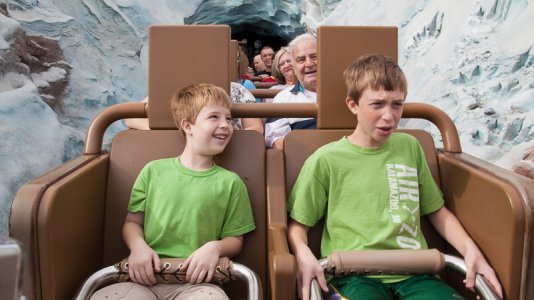
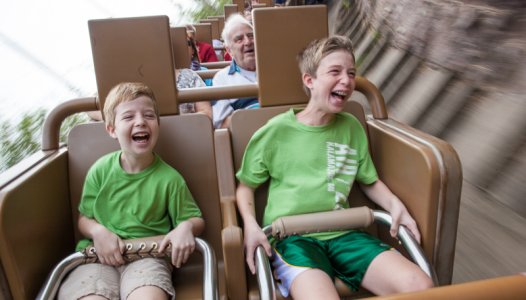
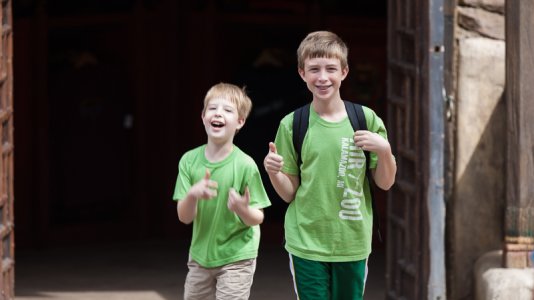
Here's a sequence of my boys on Everest. As you can see from the pictures, my younger son (on the left) is on the wild side and my older son is a little more cautions and needs time to warm up.

_MG_7945.jpg_MG_7952.jpg_MG_7954.jpg_MG_7969.jpg_MG_7984.jpg_MG_8130.jpg

The very last picture is a bit off. The others all show the boys on the ride. On the other hand, it helps end the story. Incidentally, it was taking later in the day when they rode it themselves. I think it was the first time they rode a ride without my wife or I guiding them.

The second to last picture is my favorite Disney picture. It's not even close to being perfect technically, but it shows both boys having fun. The shutter speed was slow enough to get some motion blur but quick enough for them to look sharp. The old guy in the background is my father. The best pictures are the ones that have the best emotional impact on you, not the ones that would win a contest.
 
That 's the way I do it, but my son just showed me that his phone (Pixel 7) has a "Long exposure mode" that works in broad daylight without any filters. Amazing.

Wow! This just reinforces the point that the phone cameras will probably replace the big cameras for the masses. Why mess around with the extra weight of camera and tripod if the smart phones can do this?

Guess I'm going to be saving hard for the next iPhone.


OM Systems OM-1 also has a ND mode, works pretty well in daylight.

In built? For the mirrorless? Nice!!!
 
Need a quick answer....Dance Team Spring Show Saturday. Stage is on the dark side and movement is QUICK! No time to manual focus; action is continuous and requested we not use flash. Been photographing in this auditorium for almost 20 years and haven't had much luck. I have a Panasonic DMC-FZ70. Any suggestions? We're only a little over an hour away Mark...how about driving over to Bellville and taking some photos for me! :goodvibes :tink:
 
Last edited:
Need a quick answer....Dance Team Spring Show Saturday. Stage is on the dark side and movement is QUICK! No time to manual focus; action is continuous and requested we not use flash. Been photographing in this auditorium for almost 20 years and haven't had much luck. I have a Panasonic DMC-FZ70. Any suggestions? We're only a little over an hour away Mark...how about driving over to Bellville and taking some photos for me! :goodvibes :tink:
Seeing that Mark’s not here right now and you seem in a hurry, I will provide you a couple of articles and thoughts that might help. This was one of the challenges that initially got me into manual photography, too. (Indoor sports, which are very similar.)

I see you are using a bridge camera. I have little doubt Mark would be able to eke out some great shots there with it today even though it’s not the best equipment for shooting in these conditions. What I mean by that is that it will be possible for you to get some good shots, too, especially if you follow some of what they say here.

I will highlight the important parts for you, but keys are using Shutter Priority (freezes action) and raising the ISO up (increases your camera’s sensitivity to light). Pictures will be grainy but you can use noise reduction software later. If you use RAW you can easily fix your images later if colors are off, but it’s not absolutely necessary. If you don’t normally do editing you can use the software that came with your camera, which makes it easy.

1.) https://www.anastasiajobson.com/2020/01/17/how-to-photograph-dance-camera-settings/

- There are 2 WAYS you can approach dance photography: freeze the movement or creatively blur it.
- Use a faster shutter speed to freeze motion and slow to get a motion blur.
- To get a crisp and super sharp dance image, alter your camera settings to at least 1/500s shutter speed.
- With a shutter speed of 1/2000s you can freeze any human movement (so start at 1/500 but go faster if needed)
- For a creative MOTION BLUR in your dance images, set your shutter speed to 1/100s or slower (best if you have a monopod to keep the camera very still, but you could try leaning the camera on the seat in front of you or something else if that’s available to use).
- Another way to photograph dance with a sense of motion in the images, is to move along with the dancer. Pan your camera in the direction of the movement. This way the background will turn into a blur while the dancer is still in focus.

- Have a simple and clean background, so your images don’t get too busy. Have your dancer as focus of attention, let them stand out.
- My favourite way to focus on movement is using manual selection of AF-zones on the back of the camera. I think about the composition before pressing the shutter. I select which the part of the screen where I want to place a dancer, then I press the shutter halfway to make sure the focus is where I want it to be (mostly a dancer’s face). Then I press the button all the way. (This should give a little square to where you want your focus.)


2) https://improvephotography.com/29758/great-dance-recital-photographs-nine-easy-steps/

- I’d suggest either using full manual mode, or speed priority mode. That’s because shutter speed is the most important variable in shooting moving objects in low light.
- Dancers are seldom stationary, so even a slight movement will require you to speed up that shutter to 1/125th of a second. A walking dancer (again, not often seen in the real world) requires a much faster 1/250th of a second. And when dancers are doing what they are born to do – namely running and jumping all over the stage — you’re going to have to set that speed to 1/500th of a second.

So, how do you get to 1/500th of a second? It all depends on your camera and your lens. A fast lens, f/2.8 or faster, helps a lot. But even with that, you’re probably going to have to increase your sensor’s sensitivity by bumping up your ISO. How far? Well, that also depends on the available light. But you’ll probably be in the iso 800 range. But there are so many variables, it’s impossible to come up with a rule of thumb. Every theater and performance is unique, and your lighting can change dramatically, even in the middle of a recital. (And they are talking about a DSLR here.)
- I like to bring along a monopod to these kinds of events. Easier to use, and less cumbersome than a tripod, a good monopod really does keep your camera steady.
- What do you do if you only have a slower lens? Well, if the lens doesn’t have a constant aperture (meaning it’s faster when it’s zoomed out than when it’s zoomed in) make sure you get as close to the stage as possible and resist zooming in.
- Try to capture images that focus in on the dancers’ feet, the way they hold their hands, or ever the way two dancers connect through eye contact. Remember that the best photographs do more than capture an event as it happens. The best photographs tell a story. (In other words, get other nice pictures of the performers besides when they’re dancing.)

Why not find a space that’s out of the way and shoot some portraits? The dancers are usually excited to have their portraits taken, and who could blame them? After all, their hair is done, their makeup is perfect and they’re wearing wonderful costumes.

Hope this helps! Good luck!
 
Last edited:
Need a quick answer....Dance Team Spring Show Saturday. Stage is on the dark side and movement is QUICK! No time to manual focus; action is continuous and requested we not use flash. Been photographing in this auditorium for almost 20 years and haven't had much luck. I have a Panasonic DMC-FZ70. Any suggestions? We're only a little over an hour away Mark...how about driving over to Bellville and taking some photos for me! :goodvibes :tink:
Sorry I missed this. I don't have too much to add over what Pea-n-Me said. That's a tough shoot. To be frank, try your best, but if it isn't working, just take some wide shots to remember the event by or buy pictures from a pro shooting the event, and then just relax and enjoy the event. There have been plenty of times that, with the equipment I had available, I couldn't shoot an event well enough to make it worth the effort.

I would take a slightly different approach to PnM. Here are my thoughts when shooting something like this.

I'd set your ISO to it's max. Not the max that gives you good results. The max max. Noise is ugly, but it is better than blurry pictures and easier to fix. Too many are afraid to go too high on their ISO because they want to avoid the grain and they end up with less grainy pictures that are too blurry to be useful.

I'd put my camera in aperture priority and set it at my widest possible aperture. Make sure that you zoom all the way out when you set the aperture. Why use aperture priority over shutter priority when it is the shutter speed that you're most worried about? Because you want the fastest possible shutter speed for any shot. You'll get that at your highest ISO and widest aperture. If you shoot in shutter priority, there may be times when the light is a bit better and you could have gotten away with a faster shutter speed. In Shutter Priority mode, your camera will reduce your aperture rather than take advantage of that extra light for a faster shutter.

Take a ton of pictures knowing that fewer than 1 in 10 (and maybe much worse) will be any good. Look for spots where the action is slower, like somebody pausing before changing directions or somebody striking and holding a challenging pose for a moment. I haven't shot a lot of dance stuff, but I remember the dancers having lots of very quick pauses.

Try panning shots when you can. As your subject moves left-to-right or vice-versa, keep your eye locked on their face and move the camera to track them. It helps if you have a visible focus point or something that you can use to help keep the camera still relative to their head. These are tough shots, but when they work, you'll capture their face cleanly with a picture that shows their motion across the stage.

Take some easier shots. Take shots of the kids before and after the competition. Take shots of people moving props onot the stage. Anything that tells the story of the event. Take wide shots (where motion is less magnified and so you can get away with a slower shutter speed). Take shots of the kids bowing at the end of the performance. They aren't the classic dance shots you want, but they are more attainable and still valuable.

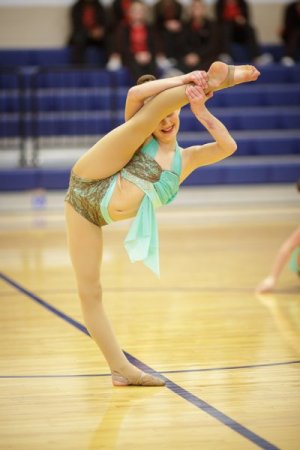
Here are a few shots from the two different non-ballet dance events I've shot.

_D3_5660.jpg
This is an example of a static pose where shutter speed isn't nearly as important.

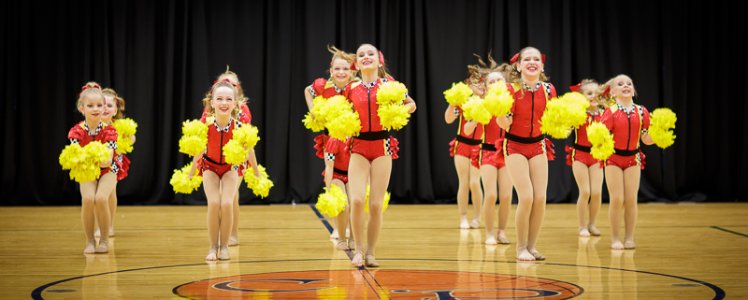
_D3_7672.jpg
Here's an example of a wide shot where you can also get away with a slower shutter speed.

MB4_2152.jpg
Here's a shot from a hip hop performance that had some static poses mixed in with the dancing.

_D3_7115.jpg
This is an example of a shot you just aren't going to get without the right gear no matter much you know and how hard you try. It was shot at "only" ISO 800, but with a f/1.6 aperture and a 1/1250s shutter speed.

Good luck and have fun.
 
Seeing that Mark’s not here right now and you seem in a hurry, I will provide you a couple of articles and thoughts that might help. This was one of the challenges that initially got me into manual photography, too. (Indoor sports, which are very similar.)

I see you are using a bridge camera. I have little doubt Mark would be able to eke out some great shots there with it today even though it’s not the best equipment for shooting in these conditions. What I mean by that is that it will be possible for you to get some good shots, too, especially if you follow some of what they say here.

I will highlight the important parts for you, but keys are using Shutter Priority (freezes action) and raising the ISO up (increases your camera’s sensitivity to light). Pictures will be grainy but you can use noise reduction software later. If you use RAW you can easily fix your images later if colors are off, but it’s not absolutely necessary. If you don’t normally do editing you can use the software that came with your camera, which makes it easy.

1.) https://www.anastasiajobson.com/2020/01/17/how-to-photograph-dance-camera-settings/

- There are 2 WAYS you can approach dance photography: freeze the movement or creatively blur it.
- Use a faster shutter speed to freeze motion and slow to get a motion blur.
- To get a crisp and super sharp dance image, alter your camera settings to at least 1/500s shutter speed.
- With a shutter speed of 1/2000s you can freeze any human movement (so start at 1/500 but go faster if needed)
- For a creative MOTION BLUR in your dance images, set your shutter speed to 1/100s or slower (best if you have a monopod to keep the camera very still, but you could try leaning the camera on the seat in front of you or something else if that’s available to use).
- Another way to photograph dance with a sense of motion in the images, is to move along with the dancer. Pan your camera in the direction of the movement. This way the background will turn into a blur while the dancer is still in focus.

- Have a simple and clean background, so your images don’t get too busy. Have your dancer as focus of attention, let them stand out.
- My favourite way to focus on movement is using manual selection of AF-zones on the back of the camera. I think about the composition before pressing the shutter. I select which the part of the screen where I want to place a dancer, then I press the shutter halfway to make sure the focus is where I want it to be (mostly a dancer’s face). Then I press the button all the way. (This should give a little square to where you want your focus.)


2) https://improvephotography.com/29758/great-dance-recital-photographs-nine-easy-steps/

- I’d suggest either using full manual mode, or speed priority mode. That’s because shutter speed is the most important variable in shooting moving objects in low light.
- Dancers are seldom stationary, so even a slight movement will require you to speed up that shutter to 1/125th of a second. A walking dancer (again, not often seen in the real world) requires a much faster 1/250th of a second. And when dancers are doing what they are born to do – namely running and jumping all over the stage — you’re going to have to set that speed to 1/500th of a second.

So, how do you get to 1/500th of a second? It all depends on your camera and your lens. A fast lens, f/2.8 or faster, helps a lot. But even with that, you’re probably going to have to increase your sensor’s sensitivity by bumping up your ISO. How far? Well, that also depends on the available light. But you’ll probably be in the iso 800 range. But there are so many variables, it’s impossible to come up with a rule of thumb. Every theater and performance is unique, and your lighting can change dramatically, even in the middle of a recital. (And they are talking about a DSLR here.)
- I like to bring along a monopod to these kinds of events. Easier to use, and less cumbersome than a tripod, a good monopod really does keep your camera steady.
- What do you do if you only have a slower lens? Well, if the lens doesn’t have a constant aperture (meaning it’s faster when it’s zoomed out than when it’s zoomed in) make sure you get as close to the stage as possible and resist zooming in.
- Try to capture images that focus in on the dancers’ feet, the way they hold their hands, or ever the way two dancers connect through eye contact. Remember that the best photographs do more than capture an event as it happens. The best photographs tell a story. (In other words, get other nice pictures of the performers besides when they’re dancing.)

Why not find a space that’s out of the way and shoot some portraits? The dancers are usually excited to have their portraits taken, and who could blame them? After all, their hair is done, their makeup is perfect and they’re wearing wonderful costumes.

Hope this helps! Good luck!
THANKS...will give your suggestions a try. I'm "vertically challenged" and always manage to be the "lucky one" that has the tallest person in the audience sit in front of me but plan on "floating" today so I'll see what happens. Gotta fun...time is short before curtain goes up! :goodvibes :tink:
 
Sorry I missed this. I don't have too much to add over what Pea-n-Me said. That's a tough shoot. To be frank, try your best, but if it isn't working, just take some wide shots to remember the event by or buy pictures from a pro shooting the event, and then just relax and enjoy the event. There have been plenty of times that, with the equipment I had available, I couldn't shoot an event well enough to make it worth the effort.

I would take a slightly different approach to PnM. Here are my thoughts when shooting something like this.

I'd set your ISO to it's max. Not the max that gives you good results. The max max. Noise is ugly, but it is better than blurry pictures and easier to fix. Too many are afraid to go too high on their ISO because they want to avoid the grain and they end up with less grainy pictures that are too blurry to be useful.

I'd put my camera in aperture priority and set it at my widest possible aperture. Make sure that you zoom all the way out when you set the aperture. Why use aperture priority over shutter priority when it is the shutter speed that you're most worried about? Because you want the fastest possible shutter speed for any shot. You'll get that at your highest ISO and widest aperture. If you shoot in shutter priority, there may be times when the light is a bit better and you could have gotten away with a faster shutter speed. In Shutter Priority mode, your camera will reduce your aperture rather than take advantage of that extra light for a faster shutter.

Take a ton of pictures knowing that fewer than 1 in 10 (and maybe much worse) will be any good. Look for spots where the action is slower, like somebody pausing before changing directions or somebody striking and holding a challenging pose for a moment. I haven't shot a lot of dance stuff, but I remember the dancers having lots of very quick pauses.

Try panning shots when you can. As your subject moves left-to-right or vice-versa, keep your eye locked on their face and move the camera to track them. It helps if you have a visible focus point or something that you can use to help keep the camera still relative to their head. These are tough shots, but when they work, you'll capture their face cleanly with a picture that shows their motion across the stage.

Take some easier shots. Take shots of the kids before and after the competition. Take shots of people moving props onot the stage. Anything that tells the story of the event. Take wide shots (where motion is less magnified and so you can get away with a slower shutter speed). Take shots of the kids bowing at the end of the performance. They aren't the classic dance shots you want, but they are more attainable and still valuable.

Here are a few shots from the two different non-ballet dance events I've shot.

View attachment 755257
This is an example of a static pose where shutter speed isn't nearly as important.

View attachment 755258
Here's an example of a wide shot where you can also get away with a slower shutter speed.

View attachment 755259
Here's a shot from a hip hop performance that had some static poses mixed in with the dancing.

View attachment 755260
This is an example of a shot you just aren't going to get without the right gear no matter much you know and how hard you try. It was shot at "only" ISO 800, but with a f/1.6 aperture and a 1/1250s shutter speed.

Good luck and have fun.

Well that makes me feel better knowing YOU have issues too! I DO get good shots during the last "pause" at the end of numbers and all the photos are for my personal use so it's no big deal when I have a "total fail". Wish they would do the show in the gym...always get better photos there but they never ask ME for my opinion. :rotfl: Always take tons of before after photos so do have those memories. We'll see what happens this afternoon. Off to the show...:tink:
 

GET A DISNEY VACATION QUOTE

Dreams Unlimited Travel is committed to providing you with the very best vacation planning experience possible. Our Vacation Planners are experts and will share their honest advice to help you have a magical vacation.

Let us help you with your next Disney Vacation!


facebook twitter
Top